Contents:
- General
- Code Docs
- Installation
Development Status
Use Cases
Concepts and Terminology
Current Limitations
Client Interface Documentation
Standing up a Server
Installation in a new iOS app
Building and Running SharedImages
Using Google Drive and Google Sign-In (optional)
Using Facebook Sign-In (optional)
Using Dropbox Sign-In (optional)
Using AWS SNS for Push Notifications (optional)
Further Reading & Viewing
Development Status
- Google Drive and Dropbox are supported in terms of cloud storage systems.
- Google, Dropbox, and Facebook sign-in's are supported.
- Optimistic synchronization is used for ensuring clients have a consistent view of data (e.g., see).
- Sharing can be done with permissions of (a) read, (b) read/write, or (c) admin (read, write and invite others to share).
- Multi-version files and multi-version per-file meta data.
- File content conflicts and meta-data conflicts are resolved with application defined conflict resolution rules.
- Support for application-specific groups of files so that downloads are presented to applications in terms of changes to those groups.
- Support for sharing groups: A collection of users and the files being shared amongst those users.
- Each user that has cloud storage (e.g., Dropbox, or Google Drive), in a sharing group, uploads new files to their own cloud storage, but those files are all shared amongst the users of the sharing group.
- A user can be a member of multiple sharing groups.
- Graceful handling of cloud storage error conditions and user issues. System copes with files having their names changed or being removed, and file content changing. Similarly, graceful handling of user removal and access token authorization expiry/revocation is also incorporated.
- Builds of releases of the server are published to hub.docker.
- An example server is currently running on the AWS Elastic Beanstalk, supporting the SharedImages iPhone/iPad app
- Push notifications can be sent using AWS SNS
- Repos for this system are:
- SyncServerII server
- Swift files shared between client and server In the form of a Cocoapod.
- iOS Client for the SyncServer server.
- SharedImages Demo iOS app-- Uses the iOS Client, enables images and discussion threads to be synchronized across mobile devices & user-owned cloud storage, enables safe sharing of those images with others, and safe sharing of discussion threads.
Use Cases
1) Private Social Media
Current social media: Data is stored on corporate servers; users can lose ownership of data both “physically” and in terms of intellectual property.
If mobile app developer makes use of SyncServer:
- Data content (e.g., images) is stored in app users cloud (e.g., Google Drive)
- Data can also be safely shared with friends through various sign-in methods (e.g., Facebook)
- Users retain intellectual property rights
- The data is not searchable on search engines, and has that privacy.
2) Data Longevity
Apps sometimes hide their data: For example, you enter your favorite restaurant meals and preferences, and images of those events into an app
- App stores data internally
- If app stops being supported, users lose access to data
- If you lose your device or your backup fails, you lose access to data
If mobile app developer makes use of SyncServer:
- Data is stored in normal files (not in special database or otherwise obscured formats)
- Data is stored in normal places in users cloud storage. E.g., in Dropbox, /Apps/AppName/YourFiles
- Also enables backup and recovery in the same manner
3) Developers Save $$$
- Why should developers or small companies pay for storing users data?
- SyncServer stores content data in users own cloud storage
- Meta-data (e.g., file identifiers, version numbers), & some user credentials are stored in SyncServerII
- Estimate from SharedImages: SyncServerII data is about 1/100th size of user owned content data
Concepts and Terminology
- General
- Owning versus Sharing
- Sharing Groups
- Files and fileUUID's
- File Versioning
- App Meta Data
- Versioned App Meta Data
- File Groups and fileGroupUUID's
- Sharing Groups and sharingGroupUUID's
- Optimistic Synchronization and the Master Version
- Privacy, Safety, & Security
- File Data Representation
- Risks of User Modification of File Data
- Warning file When a user account is first created, a non-shared file can be written into that users collection of data files (e.g., named "IMPORTANT_README.txt"). The intent of this file is to warn users not to change or remove the apps data files, unless they are going to discontinue using the app.
- File Sizes & File checksums Currently, SyncServer uses file sizes to detect changes in files. A planned change to SyncServerII is to incorporate the use of checksums. This is better because some changes a user might make to a file do not have to be fatal to an app. For example, a user on a MacOS system can easily open an image file and rotate the image. That change to the file does not need to be fatal to the SharedImages app.
- Client
- Sync and Sync Queues
Users who have their uploaded files stored in their own cloud storage are termed owning users (e.g., a Dropbox or Google Drive user). Users who sign in with non-cloud storage accounts (e.g., Facebook) are termed sharing users-- any files they upload must be stored in an owning users cloud storage.
Sharing is a key element in the design of SyncServer: It enables groups of users to share files. An initial owning user implicitly creates a sharing group by creating an account on a SyncServer-based app -- using their cloud storage system credentials (e.g., Google Drive or Dropbox). This initial user must be an owning user because they own the files they upload to the cloud storage system. Owning users are able to create new sharing groups; sharing users are not able to create new sharing groups.
Other users can then be invited to the sharing group with specific permissions: read, write, or admin. Users invited with admin permissions can invite others to the group, and expand the number of users sharing the files in the group. Owning users (e.g., Dropbox, Google Drive) that accept sharing invitations will have their files uploaded to their own cloud storage. Sharing users (e.g., Facebook) that accept sharing invitations, but don't have cloud storage will have their files uploaded to the inviting users cloud storage (or if that user was a non-owning user, the owning user originating the invitation chain).
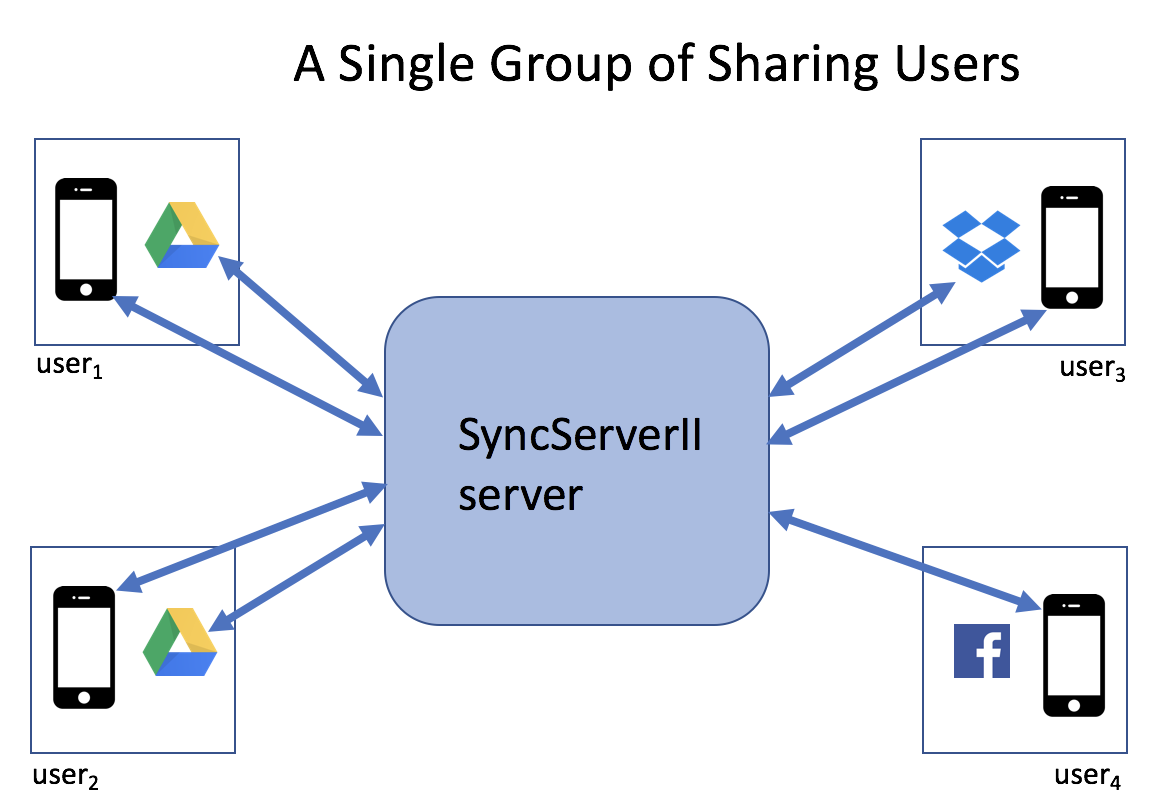
The figure above depicts a sharing group. Note that all access to cloud storage is routed through the SyncServerII server, which controls the access that others have to any single users cloud storage. That is, I only grant the sharing group access to specific files in my cloud storage. Each user in that sharing group has access rights to the files in that sharing group granted through their invitation permissions to the sharing group; other users have no access to files in that sharing group.
Files are the main unit of user data storage in SyncServer. These files are stored in a users cloud storage (e.g., Google Drive, Dropbox), and synchronized with a mobile app.
Files are uniquely identified by UUID's. These are called fileUUID's. Clients are responsible for creating these fileUUID's and giving them to the client interface.
SyncServer stores files in a versioned manner in the sense that when a new file replaces an existing file in cloud storage, it is stored with the successive next version number. Any prior version is deleted immediately beforehand. File versioning is part of a mechanism to make sure apps stay up to date with the latest uploaded data on the server. That is, the most recent version of a file has the contents a client should download. File versioning also helps allow concurrent upload of revised file data. Much of this versioning is concealed beneath the layer of the iOS client library-- but if you look at the program code, or if you look at the file names in cloud storage, you will see versioning.
SyncServer also supports per-file app-specific meta data. This is referred to as appMetaData. This data is stored in the mySQL database used by the server, and for this reason, its use should be minimized in any particular app design. The SharedImages app makes use of appMetaData to store more specialized file type information than recorded in the mime type for the file.
Similar to files, appMetaData is stored in a versioned manner-- when and if the appMetaData is updated for a particular file, the version of the appMetaData gets incremented to the next successive whole number. The purpose of this versioning is to enable client apps to stay up to date with the latest versions of the appMetaData for files.
When an app developer designs a mobile app, it may be convenient to group together collections of files. For example, in the SharedImages app, each pair of image and discussion thread text files are considered to be groups. These file groupings are supported by SyncServer.
File Groups are uniquely identified by UUID's. These are called fileGroupUUID's. Clients are responsible for creating these fileGroupUUID's and giving them to the client interface.
Sharing groups represent collections of files and users. Each user can be a member of multiple single sharing groups. Each file can be in a single sharing group. Sharing groups are intended as larger collections of files than file groups represented with fileGroupUUID's.
Sharing Groups are uniquely referenced by UUID's assigned by clients called sharingGroupUUID's's.
Another key element in the design of SyncServer is synchronization. The goal is that each mobile app should have a consistent snapshot of the data being shared by a group of users. To this end, a type of optimistic synchronization is used. The synchronization is optimistic in that it is generally assumed that simultaneous updates of the data being shared by a group of users will be relatively infrequent.
For the data for a single sharing group, a single integer called the master version is persistently maintained (in the SyncServer mySQL database). Each time a group of files is uploaded by an app, the master version is incremented. Thus, the master version represents the overall (or master) version of a collection of files (and appMetaData) being shared by a group of users. Every time a client app asks for or sends data to the server, it gives what it thinks is the current master version. If that master version is actually out of date (i.e., doesn't match the master version known to the server), then the server rejects the client request. And then the client must recover from this rejection. Since synchronization, and hence these rejections, should occur only infrequently, this recovery should be infrequent. This rejection recovery occurs purely within the iOS client layer, and is not seen by the mobile app developer (except perhaps for some event reporting).
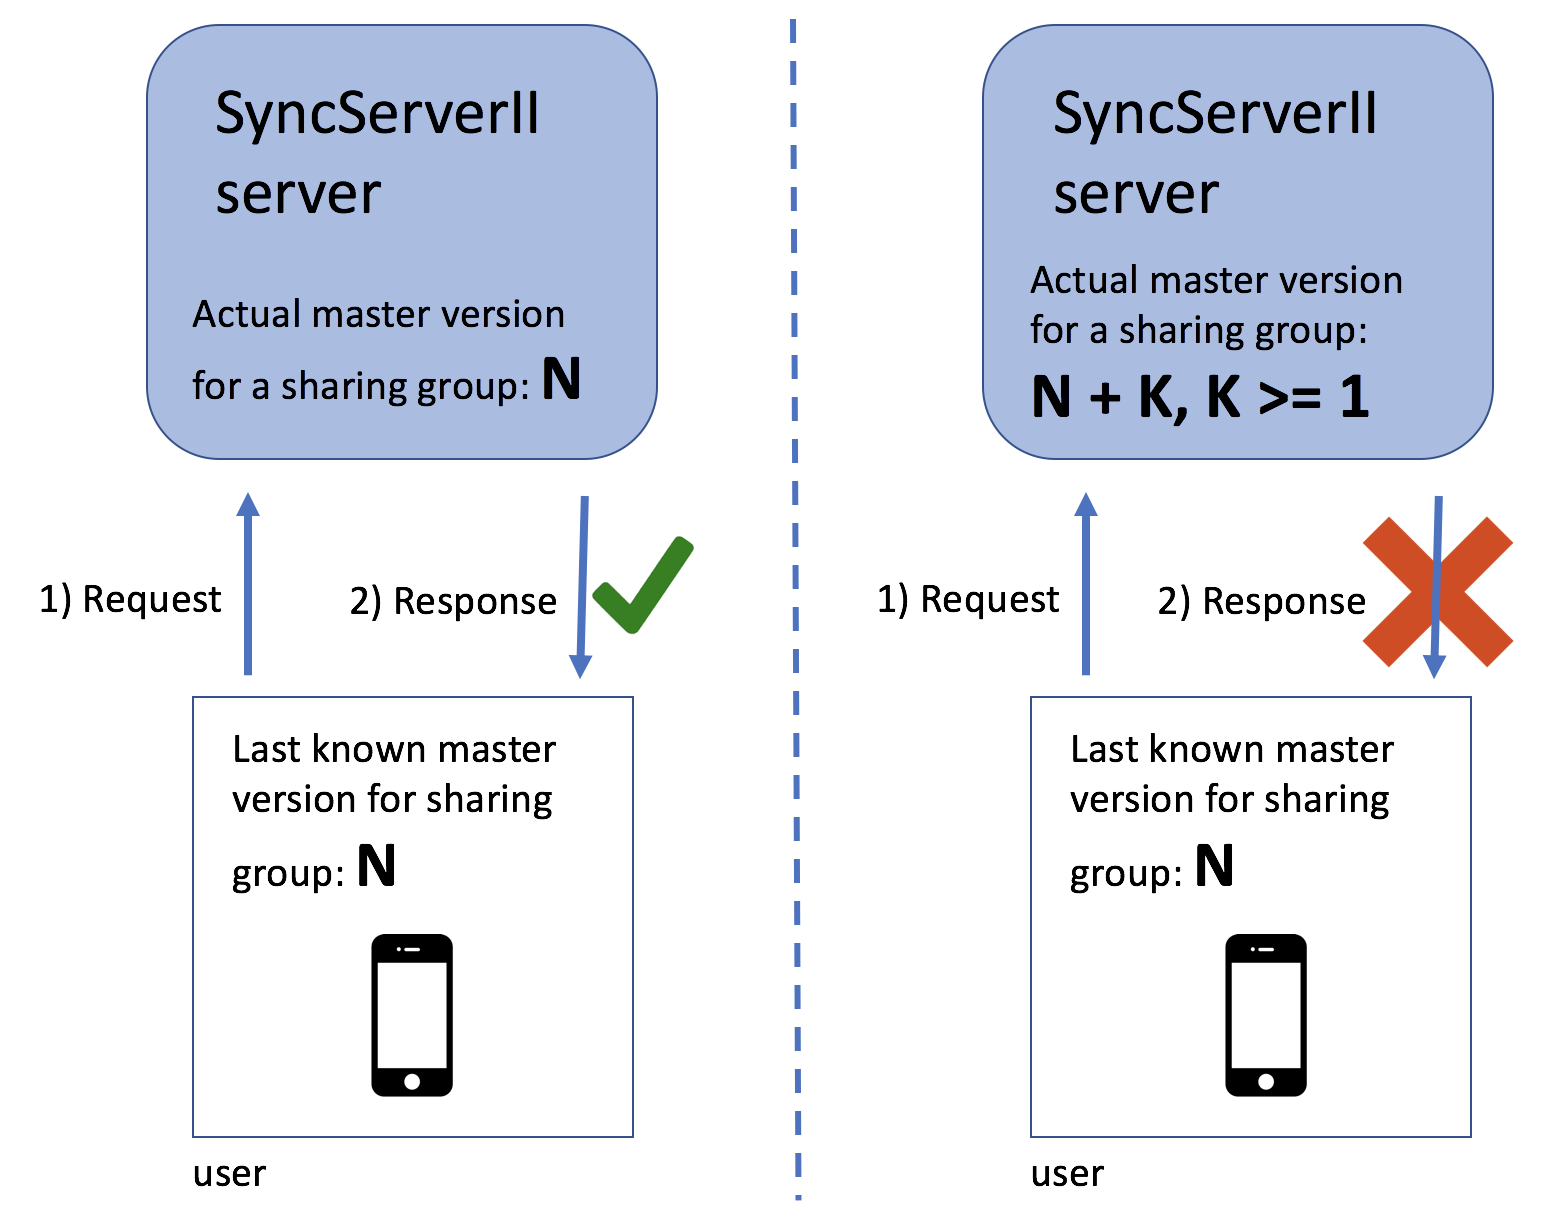
The left panel of the above figure depicts a successful exchange between the client app and the SyncServerII server-- the client knows the exact value of the current master version for the sharing group. The right panel of the above figure depicts an unsuccessful exchange between the client app and the SyncServerII server-- the client's value for the master version is out of date. Note that in the case of an unsuccessful exchange, the client can still perform certain server requests -- for example, the client can do an Index endpoint request to get (a) the current master version value, and (b) the file meta data (not the appMetaData) for the current collection of files in a file sharing group (e.g., fileUUID's, and file versions).
SyncServerII enables data to be safely shared amongst groups of users. SyncServerII provides privacy and safety in the sense that the files and other information stored in SyncServer will not be searchable by search engines, and only users who you have granted access to your files get access to the specific set of files in the sharing group in SyncServer.
SyncServerII emphasizes privacy and safety over security (e.g., that security can be in the hands of the developer creating the mobile app and deploying the SyncServer server) -- but if a user is happy with the security of their data in a cloud storage service, e.g., Google Drive or Dropbox, they will likely be happy with the security of storage in SyncServer.
SyncServer does persistently store authorization tokens for the cloud storage service for owning users. For example, suppose an owning user is using Google Drive to save their files in a mobile app incorporating SyncServer. Then, SyncServer persistently saves an Oauth2 token for accessing Google Drive for that user in its mySQL database. It is necessary for SyncServer to store these authentication tokens to enable sharing of a users data, when that sharing is authorized. SyncServer never has access to a users username or password on cloud storage services (or other sign-in methods such as Facebook). Sign in is handled using the sign-in mechanism specific to that sign-in method.
An intent of SyncServerII based apps is to allow users to own their data. For example, if an app developer stops maintaining an app a user shouldn't be stranded and lose their data. To this end, file data representations should be chosen where that file data content is available to end-users.
For example, two types of files are used in SharedImages: JPEG image files and text files for discussion threads. The image files are directly usable by users. For example, if an owning user stores their files in Google Drive, then they can open their Google Drive and view the images. The text discussion threads are a little more difficult. They are stored in JSON format, and so will likely be cryptic to an end-user. However, *all* of the discussion thread content is present in these files in plain text.
Similarly, an app developer should make minimal use of the `appMetaData` capabilities of SyncServer. This data is stored in a mySQL database -- and is thus not available to an end-user.
Because an app's files live in end-users cloud storage, there is a risk that users might alter or remove these files. Currently, SyncServerII has two strategies for dealing with this:
A typical pattern of using the iOS client interface is the following:
    guard let sharingGroupIds = SyncServerUser.session.sharingGroupIds, sharingGroupIds.count > 0 else {
        // Should not happen if a user is signed in
        return
    }

    let sharingGroupId = sharingGroupIds[0]

    do {
        // sharingGroupId must be used in attr1 and attr2
        try SyncServer.session.uploadImmutable(localFile: url1, withAttributes: attr1)
        try SyncServer.session.uploadImmutable(localFile: url1, withAttributes: attr2)
    } catch {
    }

    SyncServer.session.sync(sharingGroupId: sharingGroupId)
That is, you typically queue up some files for upload (e.g., using uploadImmutable) and then call `sync`. Each time you call the `sync` method of the SyncServer iOS client, the current pending queue of upload items is "closed", and readied for upload. This collection of files is uploaded atomically-- either all of the files make it to the server, or none of the files make it. A suitable use of this capability is to only call `sync` when you have queued uploads for all files in a single file group.
The sharingGroupId indicates which sharing group is being sync'ed. The sharingGroupId is explicitly given to the sync call in order to know which sharing group to check for downloads.
The server, and the cloud storage it references, is generally taken to be the "source of truth" -- or real value of data. Therefore, downloads from the server to the client are prioritized over uploads from the client to the server. This prioritization of downloads has an impact on how we discuss conflicts -- we talk about conflicts as stemming from downloads, though they involve an interaction between changes on the server and changes on the client.

The left and right panels of the above figure illustrate the two main categories of conflicts: Content download conflicts and download deletion conflicts.
Consider the SharedImages app, and suppose that user Chris makes a discussion thread comment, and the app uploads that comment. Next, without first refreshing, another user, Dany, in the same group comments on the same image. This is now a conflict situation: The comment thread (a file) referenced by the server, as modified by Chris, is different than the file that Dany's app is uploading. Dealing with these conflicts is known as conflict resolution. Similarly, a conflict can also occur if Chris deletes a file (say, an image and discussion thread in SharedImages), uploads that change to the server, and Dany, without first refreshing, makes a modification to the discussion thread associated with that image.
The SyncServer client leaves the details of conflict resolution decisions to the app developer, but provides some mechanisms to assist in this process. One reason that the details of conflict resolution are left to the app developer is because app developers can choose representations, in some cases, to make conflict resolution easier. For example, in the first conflict situation above, between two changes in a discussion thread file, SharedImages handles this relatively easily by disallowing individual comments to be modified, by giving each discussion comment a unique identifier, and by putting timestamps onto each comment. These app-specific decisions enable two conflicting versions of the same discussion thread file to be easily merged, and thus conflict resolution in this case is simplified.
The SyncServer client provides mechanisms to assist in dealing with conflicts in the following manner. First, conflicts are categorized into content download and download deletion conflicts. Content download conflicts are conflicts between a modified file and/or appMetaData being downloaded from the server, and the same file and/or appMetaData, modified (or deleted) by the local user and being uploaded. When these conflicts occur, the following SyncServer delegate method is called:
func syncServerMustResolveContentDownloadConflict(
    _ downloadContent: ServerContentType,
    downloadedContentAttributes: SyncAttributes,
    uploadConflict: SyncServerConflict)
The above delegate method enables client apps to choose how they want to deal with the content download conflict. For example, a client app might choose to always prioritize downloads from the server and ignore conflicting uploads.
Download deletion conflicts are between a file that was deleted on the server, and the same file and/or appMetaData having been modified or deleted locally and being uploaded. When these conflicts occur, the following SyncServer delegate method is called:
func syncServerMustResolveDownloadDeletionConflicts(
    conflicts:[DownloadDeletionConflict])
The above delegate method enables client apps to choose how they want to deal with the download deletion conflicts. For example, a client app might choose to always prioritize download deletions from the server and ignore conflicting uploads.
See also https://crspybits.github.io/iOS-Client-Docs/Conflict%20Resolution.html and https://crspybits.github.io/iOS-Client-Docs/Protocols/SyncServerDelegate.html.
- A single server supports a single type of app.
- File naming and file name extensions
E.g., suppose you have two apps, each with different Apple iOS bundle id's-- then you'll need to run two different SyncServers.
Files are uploaded from clients to cloud storage with the naming convention:
fileUUID.deviceUUID.fileVersion.FileExtension
A deviceUUID is an identifier assigned by the SyncServer iOS client library to the particular device to identify it to the server. The fileVersion is an integer corresponding to the file version as discussed above. We do not use just the fileUUID to name the file in the cloud service because the server does not hold a lock across multiple file uploads, and we need to make sure that we don't have a conflict when two or more devices attempt to concurrently upload the same file. FileExtension's correspond directly to the mime type of a file used when uploading using the client interface.
For example, here is an example of files stored in a Google Drive account by the SharedImages app:
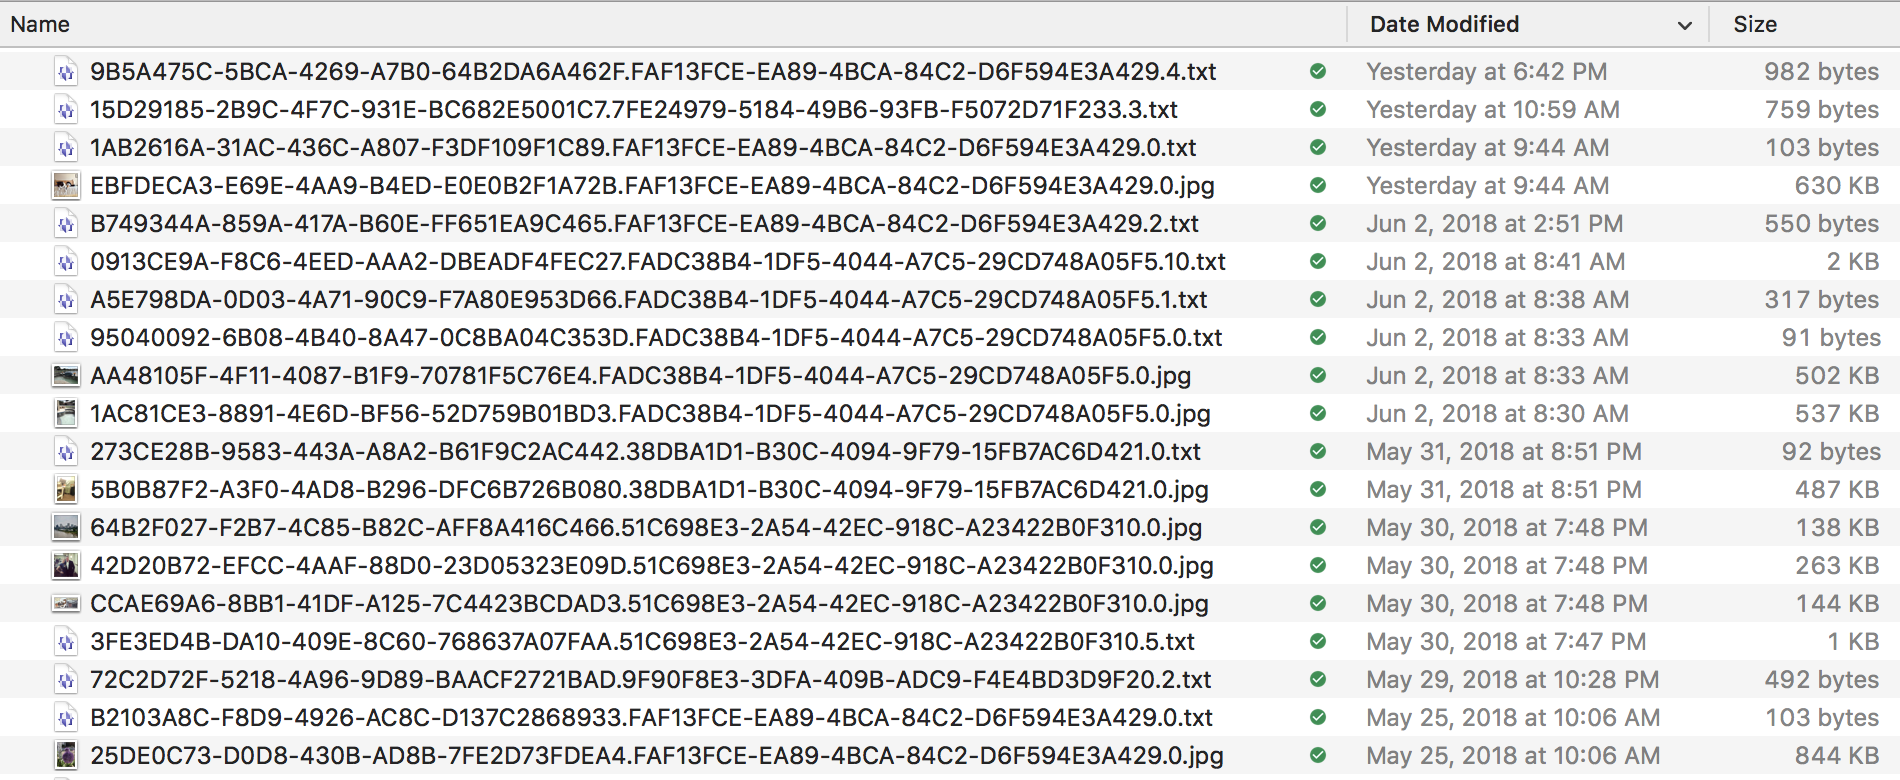
In the above figure, you can notice that all of the image (.jpg) file are at version 0-- SharedImages doesn't generally let you modify an image once uploaded. You can also notice that some of the .txt files (used for discussion threads) are at versions > 0-- this is because various users of the SharedImages app contribute to the discussion threads, and upload different versions of discussion thread files corresponding to those changes.
Note that the deviceUUID for a particular file changes when a different device (e.g., different user) uploads a new version of the file.
Client Interface Documentation
Current Limitations
- All upload and download data is processed through the server. While this provides safety, so that clients only get access to the files that are supposed to be shared, it does load the server with data traffic. It may be possible, at least for downloads, to enable clients to directly download from cloud storage, without compromising safety. For example, Dropbox's get temporary link allows for four hours of downloading of a file. (However, it appears that Google Drive API V3 only allows for permanent download links to files, not temporary links; see webContentLink-- though I'm not sure if that needs an access token).
- No streaming or chunking of file uploads/downloads This will presumably result in file size limitations and/or performance limitations with the server.
- Cryptic file names in cloud storage. It would be good to have an index.html file that could let the users see the purpose of the files in some organized manner.
- Limited client background file uploading/downloading Currently, the iOS Client will only continue downloading or uploading a single file if the user puts the client app into the background.
- Practically limited numbers of files in sharing groups Currently, when a user joins a sharing group (or a recovery operation is carried out) the SyncServer iOS client downloads all files for that sharing group at once to the mobile device. This has practical limitations. Suppose there were thousands of images in a sharing group for SharedImages. Downloading that many images at once is likely not practical.
Standing up a Server
Each separate mobile app needs its own server. That is, for iOS, each app with a separate bundle id needs its own server.
I have gone through a few incarnations of methods for installing the server, each of them on AWS. Currently, I am using a Docker image, and also use AWS Elastic Beanstalk. Previously, I was building the server directly on an AWS EC2 instance.
The two basic parts of my current deployment method are described below.
Docker
Docker is now central to my testing and deployment process for the server. For testing, I use the same Docker image that I use for building.
On my system, the following command launches that Docker image:
docker run --rm -i -t -v /Users/chris/Desktop/Apps/:/root/Apps crspybits/swift-ubuntu:4.0.0
And, of course, the path `/Users/chris/Desktop/Apps/` is specific to my system.
And running under that Docker image, this builds the server:
swift build -Xswiftc -DDEBUG -Xswiftc -DSERVER
For runtime, I use this Docker base-image and I run the script to create a Docker image for a specific release of the SyncServerII server code. Those release builds of the server Docker images live at hub.docker.
AWS Elastic Beanstalk
I use AWS's Elastic Beanstalk for reasons including:
- ease of deploying new versions of my server
- its ability to run servers from Docker images
- the relative ease of spinning up (and down) of new server environments-- so I can create and use a staging or testing environment for just a few hours
- my (potential) eventual need for scaling the server to deal with a larger load from client apps.
My deployment process to the AWS Elastic Beanstalk takes several steps, some of them manual.
Server configuration
When the server starts, it reads configuration information from a JSON file. The following details the format of that configuration file.
  {
    "mySQL.host": "URL-for-mySQL-server",
    "mySQL.user": "usernameForMySQL",
    "mySQL.password": "passwordForMySQL",
    "mySQL.database": "mySQL-database-name",
    "port": "8080",
    "allowedSignInTypes.Facebook": "true",
    "allowedSignInTypes.Google": "true",
    "allowedSignInTypes.Dropbox": "true",
    "ssl.selfSigning": "false",
    "GoogleServerClientId": "Get this when you create your Google app",
    "GoogleServerSecret": "as above",
    "FacebookClientId" : "Get this when you create your Facebook app",
    "FacebookClientSecret": "as above",
    "owningUserAccountCreation.initialFileName": "IMPORTANT_README.txt",
    "owningUserAccountCreation.initialFileContents": "IMPORTANT: The files placed in this directory should not be changed in any way. They were created by the EXAMPLE app. If they are changed, that can cause the EXAMPLE app to crash or behave unpredictably. Of course, if you want to stop using EXAMPLE, these are your files, and you are fully able to use them as you wish."
  }
When a new owning user account is created (i.e., one with cloud storage), a single non-shareable file is first created. That file has a name given by owningUserAccountCreation.initialFileName and contents given by owningUserAccountCreation.initialFileContents. The intent is that this file serves as a warning to users to not modify the files used by the app.
Installation in a new iOS app
The best instructions for setting up a new iOS app are likely found by looking over the SharedImages app, but some details are also given below.
The example app in the iOS client repo can also provide information on setting up your iOS app.
- Setup your Podfile. The SyncServer iOS client API is a Cocoapod. Google Drive and Dropbox are the current options for cloud storage. Facebook can be used to allow shared sign-in's, and is optional.
- Additions to your AppDelegate
- Add the following import
- Setup your sign-in's in the didFinishLaunchingWithOptions method If you are allowing use of Google Drive, you will need:
- Also in the didFinishLaunchingWithOptions method, you need to call
- serverURL is the URL of your SyncServer server.
- cloudFolderName is the folder name (not a path, just a folder) within Google Drive in which your files will be stored (if you are using Google Drive). Dropbox, if you are using that, doesn't need this. E.g., I'm using "SharedImages.Folder" for the SharedImages app.
- Add the following into the app:open:options: method
- To enable background downloading/uploading add this into your AppDelegate
- Setup the SharingInvitationDelegate to deal with sharing invitations received. For an example of how this is done, search for SharingInvitationDelegate in the SharedImages app.
- Setup the UI for sign-in's in your app.
- Call the `setupSignInButton` and setup delegates for your selected sign-ins. For example:
- For convenience if you are using multiple sign-in's (say, Google, Facebook, and Dropbox, the SyncServer SignIn widget can enable you to display the sign-in's automatically:
  # Some pods used by SyncServer haven't yet been released to cocoapods.org, so the following is needed.
  source 'https://github.com/crspybits/Specs.git'
  source 'https://github.com/CocoaPods/Specs.git'

  use_frameworks!

  target 'YourApp' do
      # The iOS client.
      pod 'SyncServer'

      # Only needed if you are allowing Facebook users to share.
      pod 'SyncServer/Facebook'

      # Only needed if you are using Dropbox for cloud storage
      pod 'SyncServer/Dropbox'

      # Only needed if you are using Google Drive for cloud storage
      pod 'SyncServer/Google'

      target 'YourAppTests' do
          inherit! :search_paths
      end
  end
import SyncServer
  let googleSignIn = GoogleSyncServerSignIn(serverClientId: serverClientId, appClientId: appClientId)
  SignInManager.session.addSignIn(googleSignIn, launchOptions: options)
If you are also using Dropbox, you'll need:
  let dropboxSignIn = DropboxSyncServerSignIn(appKey: dropboxAppKey)
  SignInManager.session.addSignIn(dropboxSignIn, launchOptions: options)
If you are also using Facebook sign-in, you'll need:
  let facebookSignIn = FacebookSyncServerSignIn()
  SignInManager.session.addSignIn(facebookSignIn, launchOptions: options)
SyncServer.session.appLaunchSetup(withServerURL: serverURL, cloudFolderName:cloudFolderName)
  func application(_ app: UIApplication, open url: URL, options: [UIApplicationOpenURLOptionsKey : Any] = [:]) -> Bool {
      return SignInManager.session.application(app, open: url, options: options) ||
      SharingInvitation.session.application(app, open: url, options: options)
  }
  func application(_ application: UIApplication, handleEventsForBackgroundURLSession identifier: String, completionHandler: @escaping () -> Void) {
    SyncServer.session.application(application, handleEventsForBackgroundURLSession: identifier, completionHandler: completionHandler)
  }
-
You will need to do this for at least Google.
For an example of how this is done, look in the SharedImages app.
  // For the GoogleSyncServerSignIn, the delegate in this params argument must a view controller abiding by GoogleSignInUIProtocol
  let googleSignInButton = googleSignIn.setupSignInButton(params: ["delegate": self])
  googleSignIn.delegate = self // abiding by GenericSignInDelegate

  // If you are using Facebook sign-in:
  let facebookSignInButton = facebookSignIn.setupSignInButton(params:nil)
  // Just to balance out the lengths of the sign-in buttons-- the Google button is shorter.
  facebookSignInButton.frameWidth = googleSignInButton.frameWidth
  facebookSignIn.delegate = self

  // If you are using Dropbox sign-in:
  let dropboxSignInButton = dropboxSignIn.setupSignInButton(params: ["viewController": self])
  dropboxSignInButton.frameSize = CGSize(width: googleSignInButton.frameWidth, height: googleSignInButton.frameHeight * 0.75)
  dropboxSignIn.delegate = self
  let signIn:SignIn = SignIn.createFromXib()!
  // and add this SignIn view into an appropriate view controller in your UI.
The SignIn view uses the SyncServer SignInManager to determine which sign-in buttons to display. The SharedImages app uses the SignIn view, so see that for additional code details.
Building and Running SharedImages
Downloading SharedImages and building it in Xcode will not give a clean build. You will get something like this:
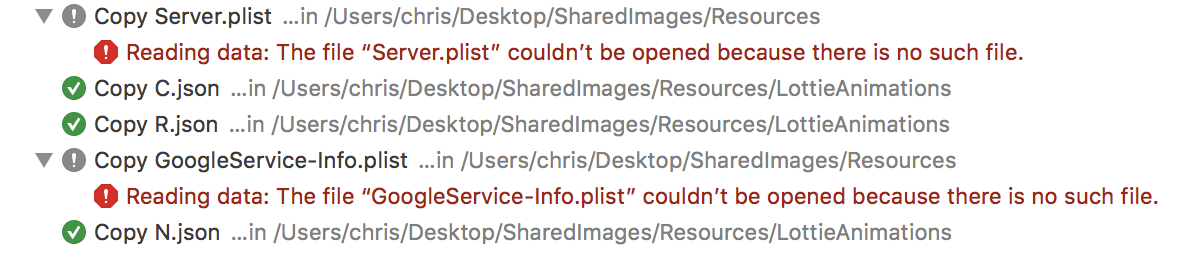
These errors occur because two files, Server.plist and GoogleService-Info.plist are present only as symbolic links-- you need to populate them for your own server and for your own Google Sign In setup.
Your own server
SharedImages relies on having a SyncServerII instance running. The Server.plist file references this server, and other setup-- for Google and Dropbox sign-in's. Thus, you will need to stand up a SyncServerII server. Once you have done that, the format of the Server.plist file is:
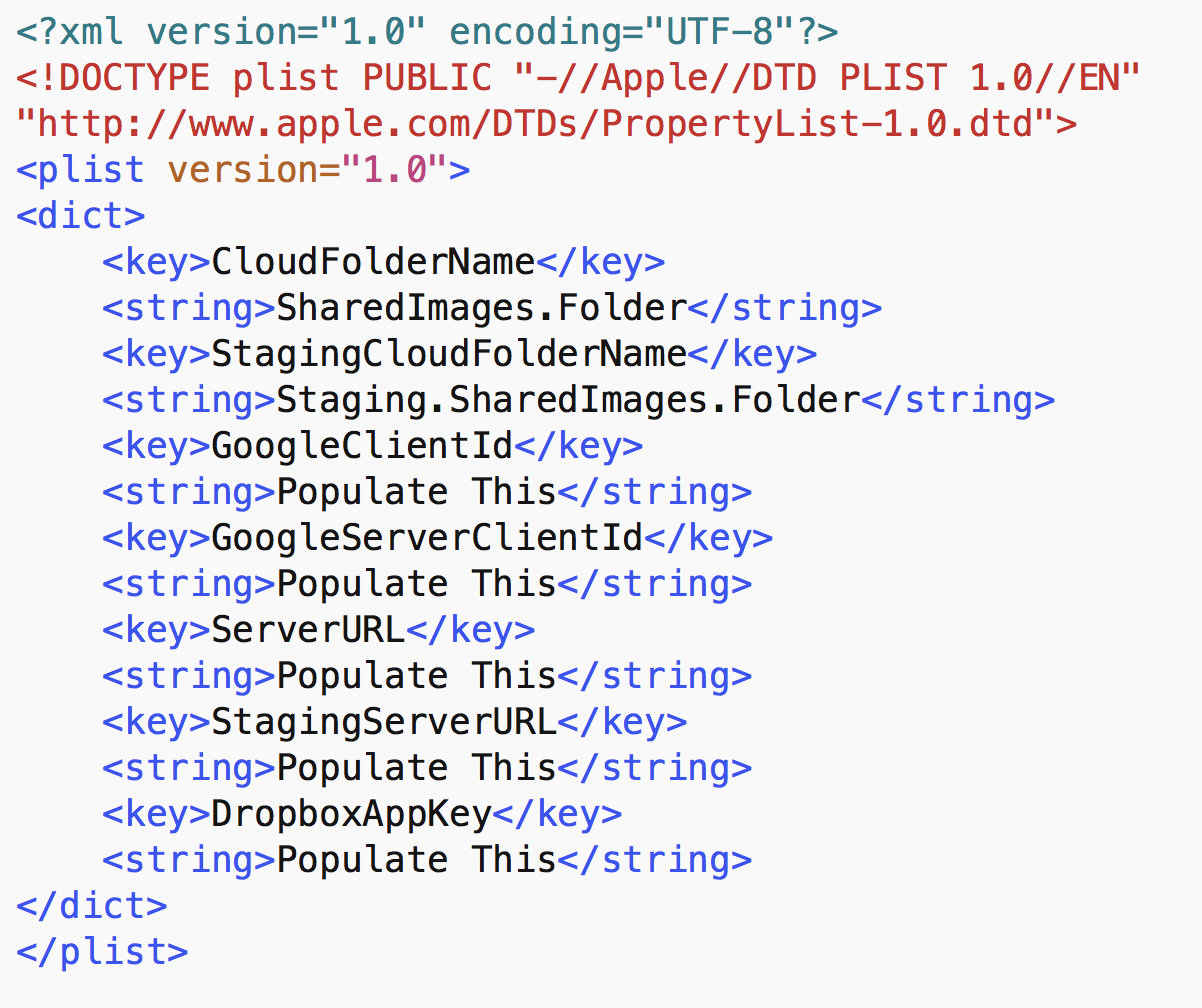
The references to Staging in the above .plist can be ignored if you are not using a staging server.
Using Google Drive and Google Sign-In (optional)
- Create Google App/Developer Credentials To enable access to user Google Drive accounts, you must create Google Developer credentials for your iOS app and SyncServer server. These credentials need to be installed in your app making use of the SyncServer client Framework. Go to https://developers.google.com/identity/sign-in/ios/start.
- You also need to make sure you enable the Google Drive API for your Google project. You can do this by going to https://console.developers.google.com, looking for `ENABLE API`, and then `Drive API`.
- Obtain your `OAuth 2.0 client IDs`. Within https://console.developers.google.com, you also need to obtain the `OAuth 2.0 client IDs` for your `Web client` (see under "Credentials). In the SyncServer configuration file this is called the GoogleServerClientId. You will need both the `CLIENT_ID` (for your iOS app) and the GoogleServerClientId (for the SyncServer server) in order for users to sign in to Google Drive from your iOS app.
- Add URL scheme for Google Sign in to your app. You do this in XCode under the "Info" tab. Look for "URL Types" and paste the CLIENT_ID into the "URL Schemes" field of a new URL Type (press the "+" button).
You need to generate a configuration file-- this will typically be named: `GoogleService-Info.plist`, and add that file to your Xcode project. Amongst other information, this .plist file contains the Google `CLIENT_ID` for your iOS app.
Using Facebook Sign-In (optional)
- Create a new Facebook app To do this, go to https://developers.facebook.com. You will need to sign in with a Facebook account. If you don't already have one, you'll have to make one. After signing in, in the upper right, under "My Apps", click on "Add a New App". Follow the instructions. They're pretty good.
- For the Server: ClientId and Secret. You will need the FacebookClientId (App ID) and FacebookClientSecret (App Secret) for the SyncServer server Server.json file from your new app on https://developers.facebook.com.
Using Dropbox Sign-In and Cloud Storage (optional)
- Register your application with Dropbox To do this, use this Dropbox link. The more general Dropbox docs are here.
- Configure your project You will need to then follow the steps under "Configure your project" in the more general Dropbox docs. You do *not* need to explicitly include the Dropbox Cocoapod in your Podfile for your Xcode project if you have followed the above Podfile instructions.
Using AWS SNS for Push Notifications (optional)
While the particular hosting service you use for running SyncServerII is your choice (I've used Docker containers, running under AWS and Elastic Beanstalk), the current implemention of push notifications in SyncServerII is specifically dependent on AWS SNS.- Create development and production certificates with Apple Currently only Apple Push Notifications are supported (APNS). For example, see.
- Add code in your iOS app to incorporate push notifications For example, see.
- Register your SNS application with AWS SNS You also need to create a platform application arn for both development and production. For example, see
- You also need an access key and secret key for AWS
- Add the following keys into the .json configuration files for your development and production servers: "awssns.accessKeyId" "awssns.secretKey" "awssns.region" "awssns.platformApplicationArn" And, of course, give them their appropriate values.
- Modify your iOS app with messages. Push notifications can be included when you use the SyncServer.session.sync call. The intent is that you are able to send out a push notification when file(s) are uploaded or upload deleted. These messages are included with the iOS app itself because the contents of push notification messages tends to be application specific.
Further Reading
- Talk given at Denver Swift Developers Group (10/25/18) Keynote slides PDF
- Talk given at roster technologies brown bag lunch series (2/6/18) PowerPoint slides YouTube video.
- Talk given to the Boulder iOS Meetup (11/21/17) PowerPoint slides YouTube video (teaser-- first 10 minutes! :) ).
- Talk given to the Denver Open Source Users Group (8/1/17) PowerPoint slides
- Blog articles on SyncServer development
- Load Testing Adventures With SyncServerII: mySQL Locking and Deadlocks (6/15/19)
- The Google OAuth Review Process (3/20/19)
- Privacy + Self-Ownership in Social Media: SyncServerII (8/18/18)
- The Client-Side SyncServer Sign-In System: Making Sign-in Sticky (10/23/17)
- Making Downloads More Flexible in the SyncServer (9/15/17)
- To Lock or Not to Lock in the SMSyncServer (9/3/16)
- Conflict Management in the SMSyncServer (5/11/16)
- Re-Architecting the SMSyncServer File System (5/9/16)
- The Many Senses of Recovery in SMSyncServer (4/26/16)
- Design Issue: Changing Cloud Storage Accounts With The SMSyncServer (4/2/16)
- Blitz to get SMSyncServer Ready for Open-Source (1/21/16)
- The SyncServer: Permanent Access to Your App Data (12/29/15)